Introduction
Welcome to Intro to Python. This book teaches Python without building terminal text-mode UI apps: we do not use Textual, Rich, or similar console UI libraries.
The first part of the course is core Python: syntax, control flow, modules, automated testing with pytest, and Pydantic / JSON. HTTP, FastAPI, Uvicorn, and HTTPX are saved for the final chapters, after virtual environments and dependency setup—so the web stack comes last.
Your work lives in a GitHub Classroom repository created from a base template. The book gives theory, directions, and code samples; you implement in that template and push for review.
Grading: Assignments are checked in part by an autograder on GitHub Classroom that runs pytest. You will learn to run pytest locally early on; the official tests live on the grader side.
Warning
Do not push your own tests
Practice tests stay local. The autograder supplies tests that you do not need to modify. Never commit or push personaltest_*.pyfiles you wrote for practice,.pytest_cache/, or__pycache__unless your instructor explicitly tells you otherwise. See Testing with Pytest for more details.
Important
GitHub Classroom
- Open Accept the GitHub Classroom assignment.
- Sign in to GitHub, accept the assignment, and wait for your personal repository.
- Complete any email / invitation steps your course requires.
- Clone your repo and open the project in your editor. (Virtual environments are covered near the end, right before the web chapters.)
Note
One template, whole series
Pay attention to various assignments listed in this book as some will have you clone additional class repos.
Tip
Submit after each milestone
When you finish a chapter’s exercises, commit with a clear message and push tomain(or the branch your instructor uses).
Warning
Feedback pull request
If your repo has a Feedback PR for instructor comments, do not merge or close it. Keep working onmainand pushing; treat that PR as a discussion thread only.
Capstone preview
There will be a capstone project that will come at the end and here is a small preview of that project.
The final project is a Python web server (FastAPI + Uvicorn) that exposes a custom route:
- Path:
GET /ping - Response body (JSON):
{"message": "pong"}
The path through the book is: basics → pytest mindset → more Python → Pydantic/JSON → venv & packages → HTTP client → FastAPI → Uvicorn → capstone.
What you need
- Python 3.12+ (match your template’s
requires-pythonif it specifies one). - Git and a code editor.
- A terminal to run
python,pip, and laterpytestanduvicorn.
Your Turn
The code that you cloned for your first assigment is prepped with some boiler plate code. There are code comments in hello.py the direct you what to do.
Make your edits and commit/push your code back up to your provided repo.
Results
Once you push your code, an automated test will run and score your assignment. To see the details, you can click on the Actions tab for your repo. Here is what that could look like.
In the GUI, or the GitHub website, click on the Actions tab.

From there, you will be able to drill down into any section you’d like. The scored results are under the Autograding Reporter section.
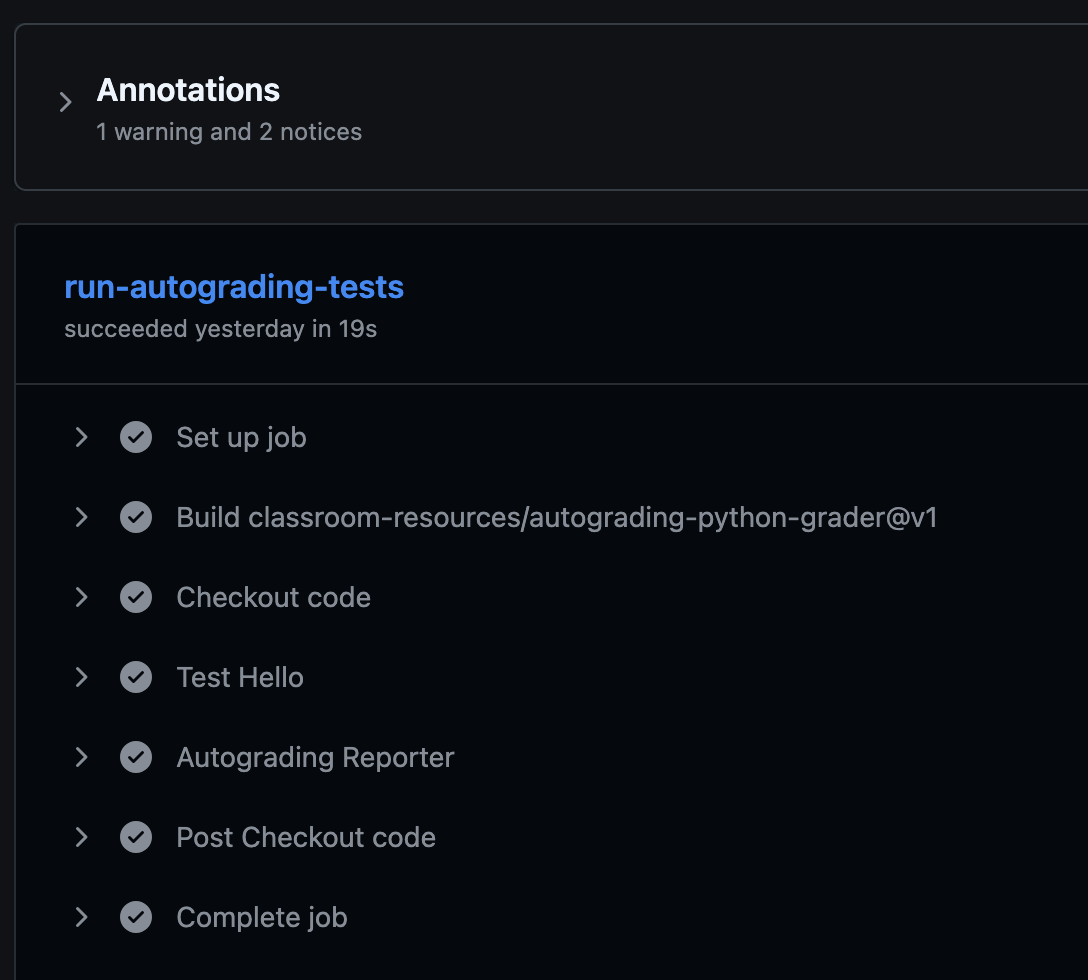
Expand the Autograding Reporter to see the finer details and your score.
🔄 Processing: test-hello
✅ test main prints hello world - line 4
Test code:
    """Check that main() prints exactly 'Hello, World!'"""

    # Run the student's main function
    hello.main()

    # Capture everything that was printed
    captured = capsys.readouterr()

    # Clean up the output (remove extra spaces/newlines)
    output = captured.out.strip()
    expected = "Just write 175 lines of Python"

    # Use pytest.fail() instead of assert → no ugly diff at the bottom!
    if output != expected:
        pytest.fail(f"Expected exactly this: {expected} But your main() printed: \
{output}")

Total points for test-hello: 50.00/50

Test runner summary
┌────────────────────┬─────────────┬─────────────┐
│ Test Runner Name   │ Test Score  │ Max Score   │
├────────────────────┼─────────────┼─────────────┤
│ test-hello         │ 50          │ 50          │
├────────────────────┼─────────────┼─────────────┤
│ Total:             │ 50          │ 50          │
└────────────────────┴─────────────┴─────────────┘
🏆 Grand total tests passed: 1/1

Notice: Points 50/50
Notice: {"totalPoints":50,"maxPoints":50}
Getting started
Important
GitHub Classroom
- Accept the GitHub Classroom assignment for this chapter.
- Complete any email / invitation steps your course requires.
- Clone your repo and open the project in your editor.
Local experimentation
main and your first program
Start with a single entry function—main—and the if __name__ == "__main__": guard. Everything else in this chapter (variables, indentation, type annotations, print) lives inside the body of main so you have one clear place where your program runs.
The main function
A function is a named block of code. main is the conventional name for the starting point of a small script or assignment.
Function signature — what you write on the def line:
def— keyword that starts a function definitionmain— the name you (and your autograder) will call()— parameter list; empty for now-> None— return type annotation: this function does not return a useful value (it returnsNoneimplicitly)
Function body — indented lines under the def. That is where your program’s work happens.
def main() -> None:
    pass  # placeholder: replace with real code
pass is a no-op: it keeps the body valid while the block is empty. Remove it once you add real statements.
Later in the course you will use the same “define main + guard” pattern so a file can also expose a FastAPI app; Uvicorn appears only in the final chapters.
Running the program:
if __name__ == "__main__":
When Python runs a file as the main script (e.g. python main.py), the special module name __main__ is used. When the same file is imported elsewhere, its name is usually the module name (e.g. main).
The guard calls main() only when the file is executed directly:
def main() -> None:
    pass

if __name__ == "__main__":
    main()
So: define main at the top level (no indentation), then invoke it inside the guard.
Indentation
Inside main
Python uses indentation (usually 4 spaces) to show what belongs to a block. Everything inside main must be indented one level more than def main.
def main() -> None:
    print("this line is inside main")

print("this line is NOT inside main — runs at import time")
There are no curly braces; the colon : after def main() -> None: starts a block, and only indentation defines where it ends.
You can nest blocks (e.g. if inside main) by indenting another level:
def main() -> None:
    if True:
        print("inside if, inside main")
Variables and type annotations inside main
Variables are names that refer to values. Declare them inside main when they are only needed for that run.
Type annotations tell readers and tools what you intend (: int, : str, …). They are optional at runtime (Python does not enforce them unless you use extra tools) but your template or rubric may require them.
def main() -> None:
    count: int = 670
    label: str = "SEC"
    ok: bool = True
    nothing: None = None
Add more statements below those lines in the same indented block.
print and f-strings inside main
Use print to send text to standard output (what you see in the terminal).
def main() -> None:
    name = "Python"
    print("Hello,", name)
    print(f"Hello, {name}! course={670}")
An f-string (f"...") lets you embed expressions in { ... } inside the string.
Putting it together
def main() -> None:
    course: int = 670
    topic: str = "Python"
    print(f"Welcome to {topic} — course {course}")

if __name__ == "__main__":
    main()
Run with:
python main.py
Your Turn
Note
Refer to your source code files for more details on what to do.
Important
Commit often and push your final solution when ready
Testing with pytest
Tip
For this chapter, you will only be creating and testing locally. The GitHub Classroom is already setup with tests to grade your solutions.
Install pytest locally
On your machine (using the same Python you use for the assignment—see the virtual environments chapter at the end of the book if you use a venv):
pip install pytest
Then run from your project root (where your code and the autograder’s layout expect to run):
pytest
A function you can test
Prefer testing functions that return values as they are often easier to assert:
# greeting.py
# a function that accepts a str typed argument and returns a str typed value
def greeting(name: str) -> str:
    return f"Hello, {name}!"
# tests/test_greeting.py  (LOCAL ONLY — see warning below)
from greeting import greeting

def test_greeting():
    assert greeting("World") == "Hello, World!"
Run: pytest test_greeting.py -v
Example test output
pytest -v
===================================================================================== test session starts =====================================================================================
platform darwin -- Python 3.14.3, pytest-9.0.2, pluggy-1.6.0 -- /Users/user/.local/pipx/venvs/pytest/bin/python
cachedir: .pytest_cache
rootdir: /Users/user/Documents/Student-Views/pygames
collected 1 item

test_greeting.py::test_greeting_name PASSED                                                                                                                                             [100%]

====================================================================================== 1 passed in 0.00s ======================================================================================
Tip
pytestwill automatically find your files that have the “test” prefix or suffix and use it. The-vis nice to see more details about the test.
Testing output
Using capsys
To check print("Hello, World!"), capture stdout with pytest’s capsys fixture:
# hello.py
def say_hello() -> None:
    print("Hello, World!")
# tests/test_hello.py  (LOCAL ONLY)
from hello import say_hello

def test_say_hello_prints(capsys):
    say_hello()
    captured = capsys.readouterr()
    assert captured.out.strip() == "Hello, World!"
captured.out is everything printed to standard output during the test.
Parametrize (optional)
Run one test logic with many inputs:
import pytest

@pytest.mark.parametrize("n,expected", [(1, 1), (2, 4), (3, 9)])
def test_square(n, expected):
    assert n * n == expected
That setup is useful when some code under test should map each input to a known result—here, squaring integers. A tiny module might define:
# math_utils.py
def square(n: int) -> int:
    return n * n
The same parametrized table then targets that function: use assert square(n) == expected in the test body instead of inlining n * n, so the examples exercise your implementation, not only the math in the test.
Final Example
Here is one final example complete with test output. For this one, the main program is quite simple, just like what you have seen already.
def main() -> None:
    # intentionally missing the comma "," after Hello
    print("Hello World!")

if __name__ == "__main__":
    main()
When you run it, you should hope to see this:
➜  hello git:(main) ✗ python3 hello.py
Hello World!
To test, you could make this:
# tests/test_hello.py

import pytest
import hello  # ← imports the hello.py module


def test_main_prints_hello_world(capsys):
    """Check that main() prints exactly 'Hello, World!'"""

    # Run the student's main function
    hello.main()

    # Capture everything that was printed
    captured = capsys.readouterr()

    # Clean up the output (remove extra spaces/newlines)
    output = captured.out.strip()
    expected = "Hello, World!"

    # Use pytest.fail() instead of assert → no ugly diff at the bottom!
    if output != expected:
        pytest.fail(f"Expected exactly this: {expected} But your main() printed: \
{output}")
The output of this failed program looks like this:
➜  hello git:(main) ✗ pytest
================================================================================= test session starts =================================================================================
platform darwin -- Python 3.14.3, pytest-9.0.2, pluggy-1.6.0
rootdir: /Users/user/Documents/IntroToPythonTemplate/IntroToPythonTemplate/hello
collected 1 item

test_hello.py F                                                                                                                                                                 [100%]

====================================================================================== FAILURES =======================================================================================
____________________________________________________________________________ test_main_prints_hello_world _____________________________________________________________________________

capsys = <_pytest.capture.CaptureFixture object at 0x10be817f0>

    def test_main_prints_hello_world(capsys):
        """Check that main() prints exactly 'Hello, World!'"""

        # Run the student's main function
        hello.main()

        # Capture everything that was printed
        captured = capsys.readouterr()

        # Clean up the output (remove extra spaces/newlines)
        output = captured.out.strip()
        expected = "Hello, World!"

        # Use pytest.fail() instead of assert → no ugly diff at the bottom!
        if output != expected:
>           pytest.fail(f"Expected exactly this: {expected} But your main() printed: \
    {output}")
E           Failed: Expected exactly this: Hello, World! But your main() printed: Hello World!

test_hello.py:20: Failed
=============================================================================== short test summary info ===============================================================================
FAILED test_hello.py::test_main_prints_hello_world - Failed: Expected exactly this: Hello, World! But your main() printed: Hello World!
================================================================================== 1 failed in 0.05s ==================================================================================
Your Turn
Note
Reminder, because there is no assigment for this chapter, there is no classroom repo to push your code.
Recreate what was shown above under A function you can test but modify it a bit. Instead of the greeting function accepting a str parameter, have it accept an int parameter for a zip code. Optionally, this is a great spot to practice parameter testing.
The return statement can still be a formatted string. For example, return f"Zip code {zipcode}".
Control flow and functions
Important
GitHub Classroom
- Accept the GitHub Classroom assignment for this chapter.
- Complete any email / invitation steps your course requires.
- Clone your repo and open the project in your editor.
if / elif / else
Conditional execution lets a program choose different code paths depending on data. In Python, an if statement runs a block only when its condition is true.
if: the first branch; runs if the condition holds.elif(short for “else if”): additional branches, checked in order only after earlier conditions failed. Use as many as you need.else: optional “catch-all” that runs when none of theif/elifconditions were true.
Python decides truth using boolean expressions: comparisons like x < y, combinations with and, or, not, and membership tests like x in items. Non-boolean values also have truthiness (for example, empty strings and empty lists count as false; non-zero numbers and non-empty collections count as true), but for clarity it is usually best to write explicit comparisons when you are learning.
Each branch is indented under its header. Only one branch from a single if / elif / … chain runs—the first whose condition is true. Order matters: put more specific or stricter checks before broader ones, or a broad condition may “win” and hide later checks.
def grade(score: int) -> str:
    if score >= 90:
        return "A"
    elif score >= 80:
        return "B"
    else:
        return "C"
Here a score of 95 satisfies score >= 90, so Python returns "A" and never evaluates the elif or else. A score of 85 fails the first test, passes the second, and returns "B". Anything below 80 falls through to else.
You can use if alone (no elif or else), or if / else without elif. Nested if statements are allowed when a decision depends on another decision; keep nesting shallow or refactor into functions or clearer conditions so the logic stays readable.
def describe(n: int) -> str:
    if n < 0:
        return "negative"
    elif n == 0:
        return "zero"
    else:
        return "positive"
Loops
Loops repeat a block of code. Python’s two main loop forms are for (definite iteration over a sequence or iterable) and while (indefinite iteration while a condition stays true).
for
for assigns each value from an iterable to a name and runs the body once per value. Common iterables include lists, strings, tuples, range, and many built-in and library types.
for i in range(3):
    print(i)

items = ["a", "b", "c"]
for item in items:
    print(item)
range is especially useful with for:
range(stop):0up tostop - 1.range(start, stop): fromstartup tostop - 1.range(start, stop, step): same idea, advancing bystep(can be negative to count down).
for i in range(2, 8, 2):
    print(i)  # 2, 4, 6
If you need both an index and the value, use enumerate:
for index, letter in enumerate("hi"):
    print(index, letter)
break exits the loop immediately; continue skips the rest of the current iteration and moves to the next value. Use them sparingly so the loop’s structure stays easy to follow.
while
while evaluates a condition before each iteration. If the condition is true, the body runs; then the condition is checked again. When the condition becomes false, the loop ends without running the body again.
n = 3
while n > 0:
    print(n)
    n -= 1
The body must eventually make the condition false (or exit with break), or the loop runs forever—an infinite loop. That is sometimes intentional (for example, a server or event loop), but often it is a bug when a counter or state never updates.
while fits problems where you do not know in advance how many iterations you need: reading until a sentinel value, retrying until input is valid, or polling until a condition holds. When you do know the count, for with range is usually clearer.
x = 1
while x < 100:
    x *= 2
# x is now the first power of 2 that is not less than 100
Functions
Define with def, document with a docstring, optionally annotate parameters and return type:
def add(a: int, b: int) -> int:
    """Return the sum of a and b."""
    return a + b
Multiple return values use a tuple (often unpacked):
def divmod_custom(a: int, b: int) -> tuple[int, int]:
    return a // b, a % b

q, r = divmod_custom(10, 3)
Your Turn
Note
Refer to your source code files for more details on what to do.
Important
Commit often and push your final solution when ready
- Write
clamp(value: int, low: int, high: int) -> intthat returnsvaluelimited to[low, high]. - Write a loop that prints squares for
ifrom 0 through 5 (e.g.i * i). - Commit and push.
Modules, imports, and collections
Important
GitHub Classroom
- Accept the GitHub Classroom assignment for this chapter.
- Complete any email / invitation steps your course requires.
- Clone your repo and open the project in your editor.
What is a module?
A module is a .py file that Python can load by name. The first time code runs import some_name, Python locates some_name.py (or a package named some_name), executes it once, and keeps the resulting namespace—the set of names (variables, functions, classes) defined in that file—in memory. Later imports of the same module reuse that cached result, so top-level code in the file does not run again.
You will work with three broad kinds of modules:
- The standard library — modules shipped with Python (
math,random,pathlib, …). You do not install them separately; you onlyimportthem. - Third-party packages — installed with
pip(orpipx) into your environment; they appear as importable top-level names (for examplerequests). - Your own modules —
.pyfiles in your project (for exampletokens.py). Python finds them when they sit on the module search path (the directory you run from, plusPYTHONPATH, plus installed packages).
Thinking in terms of modules helps you split programs into files, reuse code, and avoid one giant script.
Importing
The import statement loads a module and binds a name in the current namespace (usually the module that is doing the importing—often your main file).
import module — keep the module as a namespace
import string
import random
from datetime import datetime
With import random, you get a name random that refers to the whole module. You call its contents with dot notation: random.choice(...), random.randint(...). That makes it obvious where each name comes from and avoids clashes with your own function names.
You can shorten the name: import numpy as np.
from module import name — pull names into the current file
from datetime import datetime
Here datetime (the class) is available without the datetime. prefix. That saves typing for one or two heavily used names. The trade-off is that readers (and you, later) must remember that datetime came from the datetime package, not from your file.
You can import several names: from math import sqrt, pi, and use aliases: from pathlib import Path as P (unusual; prefer Path).
import module vs from module import name
| Style | Typical use | Pros | Cons |
|---|---|---|---|
import module | Libraries you call in many places | Clear origin (module.function); fewer name collisions | Slightly more typing |
from module import name | One or two symbols used often | Shorter call sites | Names can shadow yours or other imports; less obvious where a name is defined |
For small scripts and teaching, both are fine. In larger projects, import module (or import module as short) is often preferred for anything beyond a handful of well-known imports.
Star imports: from module import *
This form imports every public name the module exposes (often controlled by __all__ in the module’s source). Example:
from math import * # discouraged in real projects
Why avoid it in application and library code?
- Namespace pollution — hundreds of names may appear; you lose a clear list of dependencies at the top of the file.
- Unclear origin — reading
sqrt(x)does not show whethersqrtis yours, frommath, or from another star import. - Name clashes — your own function
logor a variableecan collide with imported names in subtle ways. - Tooling — linters and editors have a harder time resolving names.
Star imports are occasionally used in interactive sessions for quick exploration. For homework and production code, prefer explicit imports.
Making your own modules
Any .py file in an importable location is a module. If tokens.py sits next to main.py, you can write import tokens (or from tokens import random_token) from main.py. Python adds the script’s directory to sys.path when you run main.py, so sibling files are discoverable.
Conventions that keep this painless:
- Use lowercase module filenames with underscores:
random_token.pyis awkward;tokens.pyis idiomatic. - Put reusable functions and constants in dedicated modules; keep entry-point logic (parsing CLI args,
if __name__ == "__main__":) inmain.pyor a thin__main__pattern. - If a name should only run when the file is executed directly, guard it with
if __name__ == "__main__":soimport tokensdoes not accidentally run demo code.
As projects grow, you group related modules inside a package (a folder); see Packages below.
Lists and dicts
Lists
A list is an ordered sequence of values. It is mutable: you can change elements, append, pop, sort, and so on. Elements can be heterogeneous types, though in practice you often keep one “kind” of thing per list for clarity.
# Create a list of three integers (order is preserved).
nums = [1, 2, 3]

# Add 4 to the end of the list in place.
nums.append(4)

# First item uses index 0 (zero-based indexing).
first = nums[0]

# Negative indices count from the end; -1 is the last element.
last = nums[-1]
Indexing is zero-based: the first item is index 0. Negative indices count from the end. Accessing an index that does not exist raises IndexError.
Common patterns: iterate with for x in nums, length with len(nums), slice with nums[1:3] (a shallow copy of a sub-range). Lists are a good default when order matters and you need duplicates or frequent updates at the end.
Dicts
A dict (dictionary) maps keys to values. As of Python 3.7+, dicts preserve insertion order; the important mental model is still lookup by key, not position.
config = {"host": "127.0.0.1", "port": 8080}
print(config["port"])
config["timeout"] = 30
Keys must be hashable (strings, numbers, tuples of immutables, …). Values can be any type. Reading config["missing"] for a key that is not there raises KeyError. For optional keys, use .get:
timeout = config.get("timeout", 30) # default 30 if absent
Dicts shine when you have labeled data (records, configs, JSON-like structures). Many APIs and json.load results map naturally to nested dicts and lists.
Lists vs dicts (when to reach for which)
- Use a list when order matters and you identify items by integer position (or you only ever scan the whole collection).
- Use a dict when you look up by a meaningful key (
user_id,"host", …) or you are modeling named fields without defining a class yet.
Useful standard library snippets
The examples below tie together imports and small functions you might put in your own utility module. They rely only on the standard library.
string exposes useful string constants (for example ascii_uppercase, digits). random offers pseudorandom choices—fine for games and tokens in exercises; for security-sensitive secrets, prefer secrets from the standard library instead.
import string
import random

def random_token(length: int = 8) -> str:
    letters = string.ascii_uppercase
    return "".join(random.choice(letters) for _ in range(length))
datetime in the datetime package models dates and times. datetime.now() returns the current local time; .strftime(...) formats it as a string.
from datetime import datetime

def timestamp() -> str:
    return datetime.now().strftime("%Y-%m-%d %H:%M:%S")
Notice from datetime import datetime: the package is datetime, and the class is also named datetime. The import brings the class into scope; the module pattern would be import datetime then datetime.datetime.now().
Packages
A package is a directory of modules. For classic “regular” packages, the directory contains __init__.py (it can be empty). That file marks the directory as a package and can run package-level initialization or re-export names.
Example layout:
myapp/
  __init__.py
  tokens.py
  main.py
From main.py inside myapp, you might use import myapp.tokens or from myapp import tokens depending on how you run the app and how sys.path is set. Course templates often use an app/ or src/ layout; follow the template so import paths match what the autograder and pytest expect.
Subpackages are nested directories, each with __init__.py, forming dotted names like myapp.data.loaders. You do not need to design deep hierarchies early; start with one package folder and a few modules, then split when files grow large.
Your Turn
Note
Refer to your source code files for more details on what to do.
Important
Commit often and push your final solution when ready
- Create a folder named modules
- Under modules, create
tokens.pywith arandom_tokenfunction andtimestamp - Create an empty
__init__.pyfile under the modules folder - Import and call them from
hello.py. - Build a
dictrepresenting a fake server config (host,port,use_ssl) and iterate over each field to print its value with a formatted string. - Commit and push.
Pydantic models
Important
GitHub Classroom
- Accept the GitHub Classroom assignment for this chapter.
- Complete any email / invitation steps your course requires.
- Clone your repo and open the project in your editor.
Pydantic is a library that validates incoming data and builds regular Python objects you can use with attribute access (obj.field). It shines at system boundaries: JSON from HTTP APIs, records from databases, or anything parsed from text. If a value has the wrong type or breaks a rule you set, Pydantic raises a clear error instead of letting bad data spread through your code.
The examples below stay small so you can focus on syntax and validation first.
Install locally if needed (your template may already include it):
pip install pydantic
BaseModel and fields
What BaseModel is
BaseModel is a class you subclass. Pydantic injects behavior into that subclass: it knows how to construct instances from arguments or from mapping-like data (for example a dict that came from json.loads), check types and constraints, and convert simple values when safe (for example a numeric string to an int, depending on configuration).
You do not call BaseModel directly. You write:
from pydantic import BaseModel, Field

class ListenerHeader(BaseModel):
    name: str
    port: int
    enabled: bool = Field(default=True)

class ListenerOptions(BaseModel):
    use_ssl: bool = Field(default=False)
    jitter: int = Field(default=1)
    port: int = Field(default=4444)
Here ListenerHeader and ListenerOptions are model classes. Each field is declared with a name and a type annotation (str, int, bool, …). Together, the annotations describe the shape of valid data—like a schema for one record.
Fields: annotations vs Field(...)
A field is one named property of the model.
- Type only —
name: strmeans “this attribute must be a string.” There is no default, sonameis required when you construct the model. Field(...)— use this when you need a default, extra validation (minimum length, numeric bounds, regex), documentation metadata, or aliases for names that differ between Python and JSON.
So: Field(default=True) means “if the caller omits enabled, use True.” Without a default, the caller must supply name and port every time.
Rough mental model:
| Declaration | Meaning |
|---|---|
port: int | Required; must be an int (or value Pydantic can coerce to int, depending on settings). |
enabled: bool = Field(default=True) | Optional at construction time; defaults to True. |
jitter: int = Field(default=1, ge=0) | Default 1; ge=0 means “greater than or equal to 0” (example of a constraint you will see in docs and rubrics). |
You can also write simple defaults without Field, for example enabled: bool = True. Field is still preferred when you add constraints or want to attach descriptions for generated documentation.
After validation: ordinary attributes
Once Pydantic has built an instance, you read data with dot notation: h.name, h.port. The object is meant to be a convenient, typed view of the payload—not a loose dict of Any.
From a dict (JSON-shaped data)
APIs usually give you a dict, not keyword arguments. With Pydantic v2 you typically use model_validate:
data = {"name": "alpha", "port": 8080}
h = ListenerHeader.model_validate(data)
If data is missing a required key or has incompatible types, Pydantic raises pydantic.ValidationError. You can catch it or let it propagate; printing the exception shows which fields failed and why:
from pydantic import ValidationError

# Missing required field `port`
try:
    ListenerHeader.model_validate({"name": "alpha"})
except ValidationError as err:
    print(err)
Example output (wording may vary slightly by Pydantic version):
1 validation error for ListenerHeader
port
  Field required [type=missing, input_value={'name': 'alpha'}, input_type=dict]
Wrong type for port:
try:
    ListenerHeader.model_validate({"name": "alpha", "port": "nope"})
except ValidationError as err:
    print(err)
1 validation error for ListenerHeader
port
  Input should be a valid integer, unable to parse string as an integer [type=int_parsing, input_value='nope', input_type=str]
For programmatic handling, err.errors() returns a list of dicts with keys like type, loc, msg, and input.
To go back to a plain dict (for example to serialize again), use model_dump():
dumps = h.model_dump()  # {"name": "...", "port": ..., "enabled": ...}
print(f"the model {dumps}")
Creating and reading instances
You can construct models with keyword arguments matching field names:
h = ListenerHeader(name="alpha", port=8080)
print(h.name, h.port, h.enabled)  # enabled defaults True
Extra keys in a dict are ignored by default unless you change model configuration; missing required fields or wrong types trigger validation errors. That is the main payoff: invalid data fails fast at the edge of your program.
Enum and StrEnum (optional)
Sometimes a field should only allow one of several fixed values. Python’s enum.Enum (and enum.StrEnum on Python 3.11+) models that set; Pydantic accepts the member or the underlying value when validating.
from enum import Enum

class Status(Enum):
    pending = "pending"
    done = "done"
StrEnum makes each member also behave as a str—natural when the serialized JSON should be a string like "pending", not a separate JSON type.
Your Turn
Note
Refer to your source code files for more details on what to do.
Important
Commit often and push your final solution when ready
- Define
BaseModelclasses for something simple- Give it the name
User- Make a field for
username - Make a field for
age, and any default orFieldconstraints
- Make a field for
- Give it the name
- Instantiate from literals or from a
dictwithmodel_validate, then print a field. - Commit and push.
JSON serialization with Pydantic
Important
GitHub Classroom
- Accept the GitHub Classroom assignment for this chapter.
- Complete any email / invitation steps your course requires.
- Clone your repo and open the project in your editor.
What JSON is
JSON (JavaScript Object Notation) is a text format for structured data. A JSON document is built from a few value types:
- Objects — unordered mappings from string keys to values, written with
{}and key/value pairs. - Arrays — ordered lists of values, written with
[]. - Scalars — strings (in double quotes), numbers,
true,false, andnull(JSON’s “no value here” sentinel).
Despite the name, JSON is not tied to JavaScript today: it is a language-neutral interchange format. Many runtimes and tools read and write it the same way, which is why it dominates HTTP APIs, configs, and logging.
JSON is usually UTF-8 text. You can open it in an editor, diff it in Git, and debug network traffic without a binary decoder—useful for teaching and for production support.
Purpose and typical use cases
JSON sits in the middle of systems that do not share memory: they agree on fields, types, and nesting as text.
Common situations:
- Web APIs — clients and servers send request and response bodies as JSON (often with
Content-Type: application/json). - Config and tooling — project metadata (
package.json, editor settings, CI YAML-adjacent configs in JSON form) and CLI tools that emit machine-readable output. - Mobile and desktop apps — same payloads as browsers when talking to the same backend.
- Databases and search — systems that store JSON documents or return aggregate results as JSON for dashboards.
In Python, JSON maps naturally to dict (object), list (array), str, int / float, bool, and None (for JSON null) via the standard library’s json module. That mapping is convenient but untyped: every value arrives as generic dict/list primitives until you validate and narrow types.
Why pair JSON with Pydantic
At the boundary of your program (HTTP body, file, environment-driven config), data is “foreign”: keys might be missing, types wrong, or strings not parseable as numbers. Pydantic models turn that text into explicit fields with types and rules, and fail with structured errors when the payload does not match—before your business logic runs on bad data.
The sections below show serialization (model → JSON text) and parsing (JSON text → model). That round trip is the backbone of JSON APIs and of tests that lock the shape of your payloads.
Model → JSON
from pydantic import BaseModel

class PingBody(BaseModel):
    message: str

body = PingBody(message="pong")
json_text: str = body.model_dump_json()
json_bytes: bytes = body.model_dump_json().encode("utf-8")
model_dump_json() produces a string of JSON. Encoding with utf-8 gives bytes, as many HTTP stacks expect for wire data.
In FastAPI, returning a dict or a model often becomes JSON automatically; under the hood similar serialization runs.
JSON → model
raw = '{"message": "pong"}'
obj = PingBody.model_validate_json(raw)
assert obj.message == "pong"
model_validate accepts a dict (or other mapping-like input, depending on settings). model_validate_json accepts a str of JSON and parses it first—one step when the body arrives as raw text from a socket or file.
Testing JSON-shaped data
Treat JSON as input and output you must respect in tests.
Round trip. Build a model, serialize, parse again, then assert fields match. That guards your schema and defaults without hitting the network:
def test_ping_body_round_trip_json():
    original = PingBody(message="pong")
    text = original.model_dump_json()
    loaded = PingBody.model_validate_json(text)
    assert loaded.message == original.message
Invalid JSON strings. Malformed text never becomes a model: in Pydantic v2 you usually get a ValidationError whose errors() list describes a JSON parse problem rather than a field mismatch. Exercise:
import pytest
from pydantic import ValidationError

def test_ping_body_rejects_invalid_json():
    with pytest.raises(ValidationError):
        PingBody.model_validate_json("{not valid json")
Validation, not just parsing. Valid JSON with wrong shape or types should still raise ValidationError—same idea as in the Pydantic chapter when model_validate fails:
import pytest
from pydantic import ValidationError

def test_ping_body_wrong_type_in_json():
    raw = '{"message": 123}'  # JSON allows this; your model expects a string
    with pytest.raises(ValidationError):
        PingBody.model_validate_json(raw)
Snapshot-style checks. Sometimes you assert the exact serialized string (ordering, spacing). Pydantic’s JSON output is generally stable for a given model instance, but minor version differences can exist; asserting on model_dump() or on parsed fields is often more robust than brittle string equality.
API tests later. When you reach FastAPI, you will often combine HTTPX client.get / post with response.json() and then model_validate on the result—same validation pattern, one layer higher.
Your Turn
Note
Refer to your source code files for more details on what to do.
Important
Commit often and push your final solution when ready
- Using
BaseModelfrompydantic, create a model for a{"status": "ok", "code": 200}-shaped object. - Serialize with
model_dump_json(), parse back withmodel_validate_json. - Optionally, use the
assertstatement to check the original serialized object against the parsed back object. - Commit and push.
Virtual environments and packages
Important
GitHub Classroom
- Accept the GitHub Classroom assignment for this chapter.
- Complete any email / invitation steps your course requires.
- Clone your repo and open the project in your editor.
By this point in the course you have been writing Python with whatever interpreter your template and editor use. For the final web chapters, you want an isolated environment and the right libraries installed cleanly.
Virtual environments
A virtual environment is a directory of packages for one project.
python3 -m venv .venv # the .venv will be the name of the folder for your environment
Activate:
- macOS / Linux:
source .venv/bin/activate - Windows (cmd):
.venv\Scripts\activate.bat - Windows (PowerShell):
.venv\Scripts\Activate.ps1
Deactivate: deactivate
Tip
After activating, run
python --versionandwhich python(orwhere python) to confirm you are inside the venv.
Installing web and HTTP dependencies
Your Classroom template may ship pyproject.toml or requirements.txt. Typical packages for the closing chapters:
fastapi— web frameworkuvicorn— ASGI serverpydantic— data validation (you already used it earlier; ensure it is installed here if needed)httpx2— HTTP client
Example:
pip install fastapi uvicorn pydantic httpx2
Or use pip install -r requirements.txt, uv sync, or Poetry, per your template.
A tiny API in your venv
After installing packages, prove the venv works by running a minimal FastAPI app. Don’t worry, the full capstone project is just around the corner.
Create hello.py in your project root (any filename is fine; just something to keep it separate from app.py in later chapters):
# hello.py
import argparse

import uvicorn
from fastapi import FastAPI

# the object for the app itself
app = FastAPI()


# specify the root page of the app
@app.get("/")
def root():
    return {"message": "it works!"}


# the main function to drive all of it
def main() -> None:
    parser = argparse.ArgumentParser(description="Run the demo API")
    parser.add_argument("--host", default="127.0.0.1", help="Host to bind")
    parser.add_argument("--port", type=int, default=8000, help="Port to listen on")
    parser.add_argument(
        "--reload",
        action="store_true",
        help="Restart on file changes (development only)",
    )
    args = parser.parse_args()
    uvicorn.run("hello:app", host=args.host, port=args.port, reload=args.reload)


if __name__ == "__main__":
    main()
Two routes, two JSON objects—same pattern you will use for the real web chapters. main() starts Uvicorn when you run the file as a script (see below).
Start the server
With .venv activated, from the directory that contains hello.py, you can start the app in either of two ways.
1. Uvicorn CLI (points at the app object in your module):
uvicorn hello:app --host 127.0.0.1 --port 8000 --reload
- First
hello= module name (hello.py→hello). - Second
app= theFastAPI()instance in that file. --reloadrestarts when you save changes (development only).
2. From main() inside the file (same --host, --port, and --reload flags, parsed in Python):
python hello.py --host 127.0.0.1 --port 8000 --reload
Omit flags to use the defaults (127.0.0.1, port 8000, no reload). Example without reload:
python hello.py --port 9000
Both approaches call Uvicorn under the hood. Use whichever you prefer; the Uvicorn chapter compares them in more detail.
You should see log lines ending with something like Uvicorn running on http://127.0.0.1:8000 (host/port match what you passed).
Check the responses
In another terminal (venv activated is optional for curl):
curl http://127.0.0.1:8000/
Expected bodies:
{"message":"it works!"}
Or open those URLs in a browser. FastAPI also serves interactive docs at http://127.0.0.1:8000/docs.
Stop the server with Ctrl+C when you are done.
Tip
If
uvicornis “command not found”, the venv is probably not activated, or install failed—runwhich uvicorn(orwhere uvicorn) and confirm it points inside.venv.
Your Turn
- Create and activate
.venvin your repo (if you have not already). - Install FastAPI, Uvicorn, HTTPX, and ensure Pydantic is available.
- Confirm
python -c "import fastapi, uvicorn, httpx, pydantic"succeeds. - Add
hello.pywithGET /ping→{"message": "pong"}. - Start the server with
python hello.py --host 127.0.0.1 --port 8000 --reload, then verify both URLs (browser,curl, or/docs). - Commit lockfiles / dependency files your instructor wants—not
.venvitself.hello.pyis optional to commit unless your instructor asks for it.
HTTP client with HTTPX
HTTPX is a modern HTTP client (sync and async). Install it after you set up your virtual environment and dependencies (Virtual environments and packages).
GET request
import httpx

def fetch_status(url: str) -> int:
    response = httpx.get(url, timeout=10.0)
    response.raise_for_status()
    return response.status_code
Reading JSON
data = response.json()
# data is usually a dict or list
Error handling
try:
    r = httpx.get("http://127.0.0.1:8000/ping", timeout=5.0)
    r.raise_for_status()
    print(r.json())
except httpx.HTTPError as exc:
    print("HTTP error:", exc)
Implement
- Start your FastAPI app locally (later chapter) or use
https://httpbin.org/getfor a smoke test. - Write a script
probe.pythat performs a GET, prints status code and JSON (if any). - Commit and push.
FastAPI: apps and routes
FastAPI maps URL paths and HTTP methods to Python functions. JSON dict return values become JSON responses.
Minimal app
A typical minimal FastAPI module looks like this:
from fastapi import FastAPI

app = FastAPI()

@app.get("/")
def root():
    return {"hello": "world"}

@app.get("/ping")
def ping():
    return {"message": "pong"}

@app.post("/alive")
def alive():
    return {"message": "you're alive!"}
@app.get("/path")registers a GET route.@app.post(...)registers POST.- Return a
dict→ JSON object; return a list → JSON array.
Note
Typos in keys (e.g.
mesagevsmessage) become typos in JSON—clients and tests should match the exact spelling you intend.
Path vs query parameters (preview)
@app.get("/items/{item_id}")
def read_item(item_id: int, q: str | None = None):
    return {"item_id": item_id, "q": q}
FastAPI parses and validates types for you.
Implement
- Complete Virtual environments and packages so FastAPI is installed in your venv.
- Create
app.py(or the filename your template uses) withapp = FastAPI(). - Add
GET /returning any small JSON dict. - Add
GET /pingreturning{"message": "pong"}(your capstone route—keep it working from here on). - Commit and push (application code only—not personal test files).
Running the server with Uvicorn
Uvicorn is an ASGI server. It runs your FastAPI app object and listens on a host and port.
Command line
From the directory that can import your module:
uvicorn app:app --host 0.0.0.0 --port 8000 --reload
- First
app: Python module name (e.g.app.py→app). - Second
app: variable holding theFastAPI()instance.
--reload restarts on file changes (development only).
In Python (programmatic startup)
You can start Uvicorn from code instead of the CLI:
import uvicorn
from fastapi import FastAPI

app = FastAPI()

def run(port: int = 5050) -> None:
    config = uvicorn.Config(app=app, host="0.0.0.0", port=port, log_level="info")
    server = uvicorn.Server(config=config)
    server.run()

if __name__ == "__main__":
    run()
Use this when your rubric asks for python app.py instead of the uvicorn CLI.
Threading note (advanced)
Some applications run Uvicorn in a background thread next to other code. For this course, run only Uvicorn in the foreground for labs unless your instructor assigns threading.
Check it
- Start the server.
- Visit
http://127.0.0.1:8000/docsfor interactive OpenAPI docs (FastAPI feature). curl http://127.0.0.1:8000/pingshould show{"message":"pong"}.
Implement
- Document in
README.mdthe exact command to start your app (orpython ...entry). - Verify
/pingfrom browser orcurl/ HTTPX. - Commit and push.
Capstone: JSON ping web server
Requirements
Deliver a Python service using FastAPI and Uvicorn that:
| Item | Requirement |
|---|---|
| Framework | FastAPI |
| Server | Uvicorn (CLI or Server in code) |
| Route | GET /ping |
| Response | JSON body exactly: {"message": "pong"} |
| Status | 200 OK for that route |
Optional extras (only if assigned): GET / with a welcome JSON, POST /alive with a JSON body, health checks, or HTTPX integration tests.
Example core
Your implementation can look like this:
from fastapi import FastAPI

app = FastAPI()

@app.get("/ping")
def ping():
    return {"message": "pong"}
Start with:
uvicorn your_module:app --host 0.0.0.0 --port 8000
Replace your_module with your actual module path.
Checklist
-
GET /pingreturnsContent-Type: application/jsonand body{"message":"pong"}(spacing may vary; keys/values must match). - Virtual environment created and FastAPI / Uvicorn / dependencies installed per Virtual environments and packages.
- Dependencies listed in
requirements.txt/pyproject.tomlper template. - README explains how to create venv, install, and run.
- Committed and pushed to
mainfor final review (solution code only—not personaltest_*.pyfiles; see Testing with pytest).
Congratulations—you now have a minimal JSON API foundation without relying on terminal UI frameworks.